Table of Contents
#1. Is Discord really for you?
#2. Creating Your Discord Server
#6. Understanding Discord Permissions
#7. Final Checks Before Inviting Members
1. Test Your Member Experience
2. Review Your Security Settings
4. Give Your Team a Clear Place to Work
Making the Most of Your New Discord Server
Need a Hand Setting Up Your Discord?
Introduction
Discord is a chat and forum style social media platform that provides tons of communication options — from group voice and video calls, to chatroom messaging with emojis, GIFs, polls and multimedia files. Anyone can create a 'server', which is a private or public group where people join together into a community. Known for being popular among gaming, social and technical communities, Discord has a lot of options that make it great for both casual and professional audiences.
Discord makes it easy to create a server. In just a few clicks, you can have your own community with channels, roles, and a place for people to start talking.
However, if you're creating a server for your business, gaming community, or professional project, there's quite a bit more that goes on behind the scenes to set up and run your Discord.
I'm Dillon from ModWise, and I've spent years building, managing, and securing Discord servers for online communities and brands. I've worked with projects of all sizes, from small startups to professional companies with hundreds of thousands of members.
One of the biggest problems I've encountered is servers that were never properly configured in the first place. Sometimes they've grown so much that fixing their permissions and infrastructure becomes a major project of its own.
In this guide, we'll go through the fundamentals of setting up a new Discord server, including:
- Deciding whether Discord is right for your community.
- Creating your server and planning your onboarding.
- Setting up roles and channels.
- Understanding how Discord permissions actually work.
- Preparing your server for its first members.
I'll also share some recommendations from my own experience that can save you a considerable amount of trouble later.
#1. Is Discord really for you?
Discord is a community platform. A place for your people to hang out, go deeper, and enjoy rich features and long-form chats.
It's not a public discovery platform like Twitter, Facebook or Reddit, meaning the content of your chats won't be found in search engine results. It's also not a visual-first engagement platform like Instagram, or focused on short-form content like TikTok. Discord works best if you want discussion, connection, and long-term engagement.
Discord is an excellent platform if you're looking to lead with Community-Led Growth. If you're wanting more than 30 seconds of time out of your audience's day; if you're willing to create feedback loops, and get to know your community through discussion and interaction, Discord is your platform.
If you're launching a game, Discord is a great place for players to discuss updates, report bugs, and meet other players. If you're trying to reach people who haven't heard of your project yet, you'll still need other marketing channels to bring them in.
#2. Creating Your Discord Server
Discord offers a simple way to start your own server from scratch or a preset template.
Simply install Discord on your phone or PC, scroll to the bottom of your server list and click the plus (➕) icon, then 'Create a server'. Now you're down the rabbit hole.
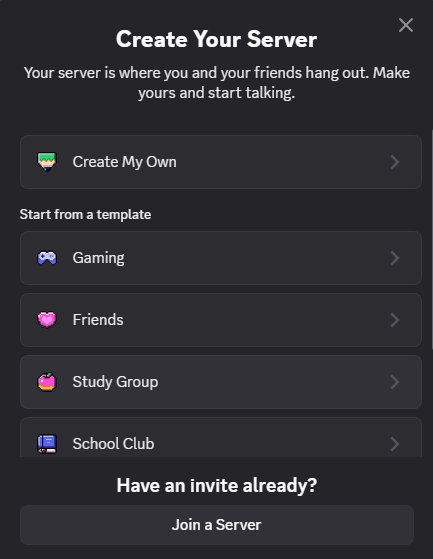
While this is a good option for casual friend groups, it's very lacking for professional purposes.
Most of Discord's starter templates are designed around casual communities and the assumption everyone in the group is a friend, giving broad permissions with open roles and channels.
This leaves you needing to put in much more work to set up your private channels, verification gates, team and mod roles, and lock down sensitive features.
If you don't understand Discord's backend, standard templates are still a decent starting place, but expect a learning curve and extra work to fit the server to your needs. If you avoid that curve, you'll likely discover issues later when your community grows and you're unsure how to manage the server.
#3. Planning Your Welcome
Discord provides simple tools for assigning people roles and introducing them to your server, but it is limited, and provides very little protection against botted accounts.
For a more professional server, you'll need to set up a verification system with onboarding. A verification system is simply a process members need to complete before accessing your main server content.
To use a verification system effectively, users need to be prevented from reading or sending messages in your channels until they've completed captcha, selected their proper roles, and read your rules. Just remember that any friction you add to prevent bots also increases the hoops real people need to jump through, so don't overcomplicate things.
My personal preference is to keep verification simple, but use very robust scam and spam filters to catch scammers the instant they try their shady schemes. Various security bots are very good about balancing security and convenience.
You can read our Best Bots article on recommended tools for security and general Discord features such as verification and anti-raid/anti-botting.
#4. Creating Your Roles
In general every professional server needs 3 main roles: Admin, Mod, Member
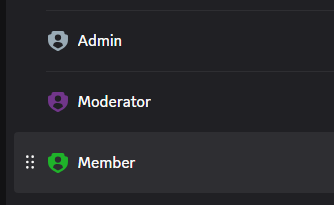
- Admin
Because the owner of the Discord has full admin rights, in most cases they fill the admin duty alone, only delegating an admin role permissions to a few trusted people. - Moderator
Mod is a housekeeping role that uses non-admin management permissions to clean up the chats and remove troublemakers. This role is often filled by the owner or team members at first, but later expands to its own role that is intentionally limited in what it can do. - Member
Member—or whatever you choose to name it—is the role everyone gets once they've completed your onboarding or verification process. Permissions should be very minimal and limited to select public channels.
Within this simple structure you have room to add more roles for various practical and fun reasons, but overall, the structure should keep these roles, functioning as the default roles in the community.
To create your roles, open your server's settings and navigate to Roles > Create Role. Name your role, configure its permissions, and save your changes.
After creating your roles, they can be click-dragged up or down in the list. It's important to note Discord roles are arranged in a hierarchy, and the most sensitive roles should be positioned near the top.
Roles can only be managed by those with the 'Manage Roles' or Admin permission, and a manager can edit, assign or delete any role lower than their highest role. This plays a critical part in security practices, though it's not something we'll cover in-depth here.
#5. Creating Your Channels
Channels are where you sort conversation, information, and access.
Discord's strength is also its weakness — long-form content is great for making connections and sharing meaningful information, but it can also bury that information for people who aren't always online. Make sure your channels are intentional, clutter free, and clearly defined.
I recommend for most servers the following channels:
Verification - If you use a verification gate, putting that channel with its info or bot at the top of the server makes it easy to find and complete.
Rules - While most Discord servers' rules are common sense, it's best to make your expectations clear in written form. Additionally, to enable the Community features of your server, which you'll want to do, Discord requires a dedicated rules channel.
Announcements - Only the owner/admin should be able to post here, but everyone should be able to read it.
Info/FAQ/Links - If you have project website, social media pages, a kickstarter campaign, or any other 'evergreen' info, this is the place to put it so it can be easily found without digging through chat history.
General chat - the default place to discuss, ask questions, and welcome new members.
Team chat - a private channel only for you and your mods. Even if your team already has discussion in another platform like Slack or group messenger, having a central place in Discord to post is helpful. Plus you'll need a private channel to configure bots, get system messages, and receive alerts.
Logs - While you may not set this up right away, Discord's built-in logs are very limited, so you'll want more thorough server logs through a separate logging bot sooner than later. Being able to access message history, member join/leave activity, moderator actions and more will save you so much guesswork when trying to figure out what is happening in the backend of your server.
As one more big tip many server owners overlook, Discord allows sorting channels under categories.
These categories create visual groups in your channel list, allowing your members to collapse and expand those groups to customize their view of your server. They also allow you to set permissions in the category, drag channels into them, and synchronize the channel to the category settings. This allows quickly editing multiple channels of the same type instead of manually editing permissions of every channel in your server — a very helpful time saver! More on those permissions in the next section.
#6. Understanding Discord Permissions
Discord permissions are often confusing and intimidating. If you don't feel that way about them, it's only because you've not seen how easily a single mis-click can send your server into total chaos. I've seen it happen many times.
While this topic could deserve its own article, I'll give the summary of permissions and how they work in Discord:
Discord has 3 layers of permissions:
- the Role Layer
- the Channel Layer
- Specific Overrides
Role Layer
Within the role menu, specific roles can be granted permissions which they are able to use across the server.
For example, if the default Member role is granted 'Send Messages', unless those permissions are specifically blocked in the announcement channel, everyone will be able to make announcements. Big red flag!
It's important to note the @everyone role is a built-in, default role automatically applied to everyone in your server. I do not recommend granting any permissions to this role unless you know what you're doing. Instead, treat your Member role as the main way to grant permissions you want everyone to always have, such as 'Change Nickname' and 'Read Message History'.
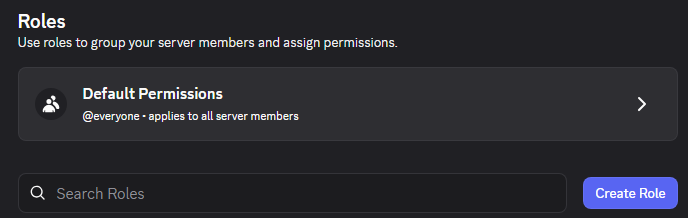
Because of the sweeping nature of the role permissions, I recommend only granting roles the permissions which they should always be able to use in every or nearly every channel.
Channel Layer
The channel layer is where you'll define each channel's main purpose, specifically as it relates to the default user in your server.
At the channel layer, you can add specific permissions for @everyone, determining what everyone in the server can do in that channel, such as sending emoji reactions, uploading files, sending messages, or even viewing the channel. This is where you define what a channel should allow by default.
Specific Overrides
Finally, there are channel overrides, which can allow giving specific roles or users explicit access to permissions in that channel, overriding the server's role permissions and the default @everyone permissions for that channel.
So let's say you wanted to create that private team channel.
You would add the Team and Mod roles to the #team-chat. Grant (✅) both roles the ability to view the channel, and deny (❌) the @everyone role 'View Channel' permissions.
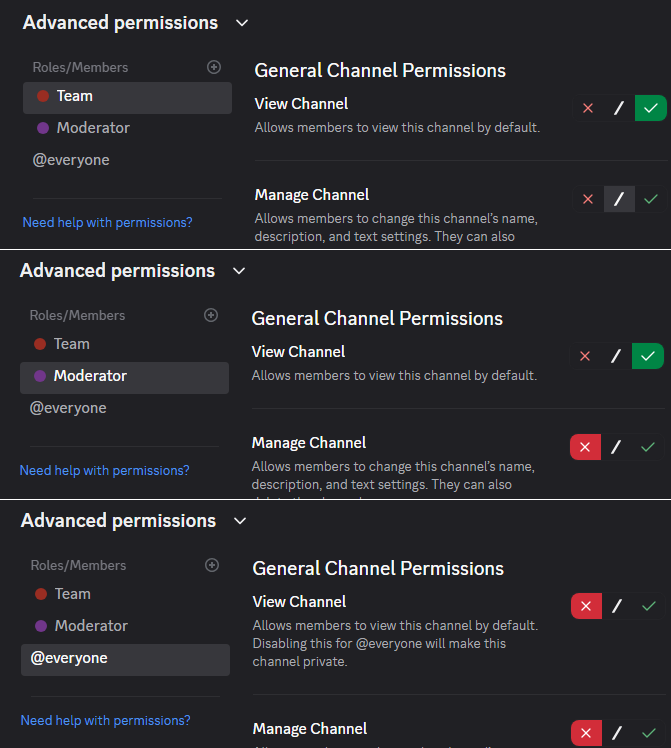
You could also add the Member role and deny (❌) it permissions, but that's redundant, since with this setup you're essentially saying, "Everyone in the server should be blocked from seeing this channel, except for those with the Team or Mod role, which we allow."
While you can set overrides for specific usernames, I would advise keeping the overrides limited to roles then granting that member the role, since member-specific permission are harder to keep track of and can lead to loopholes later.
One more thing: A green check (✅) means Allow, a red X (❌) means Deny, and the grey slash ( / ) means Neutral. Neutral simply means Discord will use the permission determined elsewhere in the layer hierarchy.
Putting the Layers Together
If I've not lost you by now, surely you're thinking, "Okay, so what do I actually DO with this info?"
As a general rule, Discord grants permissions to a role, which can be superseded by a channel's '@everyone' permissions, which can be further overridden by specific roles in that channel. Simple, right?
To further complicate things, multiple roles can combine to grant permissions that conflict.
Let's say you grant the Member role to your staff. You've disabled file uploads for Members. But you also gave them the Staff role, which you set to allow file uploads. In this case, though Staff and Member disagree, they'll be able to add files to the channels, because role permissions are looked at collectively when Discord is deciding what a user can/cannot do. In general if a member has a permission from one role, even if the other roles deny it, they'll be able to attach that perfect "predator-handshake-muscle.gif" GIF for the perfect collaborative situation.
Now let's say that same team member tries to upload a file in the announcement channel, where you've denied that permission to both staff and members. In this case, the Channel Layer takes precedence over the Role Layer, and they'll be unable to post files in that channel.
The final piece to this is Admins. Admins (and remember, the server Owner is the ultimate Admin, bypassing all roles and permissions) can bypass all channel restrictions. They get every permission in every channel. They can see, read and write in any channel; add bots, ban members, delete messages.
"So why not just give my team members admin? That's way easier." Because every catastrophic server failure I've seen happened as a result of admins,
- Having their accounts compromised because they did not understand (or despite understanding) correct security practice.
- Modifying permissions they didn't understand, enabling scammers or bad actors to access permissions in the server they should not be able to access.
Unsecured Admin permissions create issues far more often than you'd think, so I'd strongly encourage you to avoid granting admin to untrained or inexperienced staff. And give our article, 'How Discord "Hacks" Happen and How to Stop Them' a read to learn how these worst-case scenarios often happen.
#7. Final Checks Before Inviting Members
Once your channels, roles, and permissions are configured, you're almost ready to open the doors.
Before sharing your invite link, I'd encourage you to spend a few minutes testing your setup. It's much easier to correct problems when your server has five members than when it has five thousand.
Here are some things I'd check before inviting your first members.
1. Test Your Member Experience
Discord provides a useful "View Server As Role" feature that lets you preview the server from the perspective of different roles.
Use this to check what an ordinary member can see, especially if you're using private channels or a verification gate.
I'd also recommend testing with a separate account that doesn't have any administrative permissions. Go through the same steps a new member would, from accepting your invitation to completing verification and visiting channels in the server.
Can you find the rules? Is it clear where to start? Are important channels visible? Can you access anything you shouldn't?
If something is confusing to you, imagine how confusing it might be to somebody who's new to your server.
2. Review Your Security Settings
Visit your server's security settings and make sure you've enabled the features appropriate for your community.
At a minimum, I'd review:
- Server verification requirements and Rules Screening.
- Discord's native AutoMod and spam filters.
- Raid protection and suspicious activity alerts.
- Permissions to mention @everyone and @here.
- Which members and bots have Administrator, Manage Roles, or other sensitive permissions.
You should also make sure your own Discord account has multifactor authentication enabled, and I recommend requiring it for staff with moderation permissions.
If you're planning to use a security bot, take the time to configure and test it. A bot sitting in your member list doesn't necessarily mean its security features are working.
3. Set Up Your Bots
Most servers will benefit from at least one general-purpose bot, whether for automatic welcome messages, logging, utility commands, or other routine tasks.
For smaller communities, I recommend starting with only what you need.
As you begin to grow, you may want to add more specialized tools for security, member verification, support tickets, and engagement.
I've put together a separate guide covering many of my favorite tools, what they do well, and how to set them up:
Best Discord Bots for New and Professional Servers
4. Give Your Team a Clear Place to Work
If you're working with other administrators or moderators, make sure they have the access and information they need before inviting members.
Your team should know where to find logs, how to handle problematic members, which tools they're expected to use, and who to contact when something goes wrong.
You don't need a 50-page operations manual for a server with a few dozen members.
A simple set of instructions, clear roles, and a private staff channel will go a long way.
5. Get a Second Opinion
If you're building a professional community, it's worth having someone experienced review your setup before launch.
Even if you're confident in your configuration, a second pair of eyes can catch overlooked permissions, exposed commands, missing safeguards, or an awkward member experience.
ModWise also offers a free Discord Audit Bot that can review aspects of your server's configuration and identify possible risks.
It's a useful starting point for understanding where your server may need attention.
Making the Most of Your New Discord Server
At this point, you should have a reasonably well-organized Discord server with the foundation needed to begin building your community.
There's plenty more you can do with Discord. You can build sophisticated onboarding systems, automate administrative work, create private areas for different groups, run events, build entire economy systems with a shop for purchasing roles and items, and integrate your server with other platforms.
But you don't need to do all of that right away.
Start with a clear purpose, sensible permissions, and a handful of channels that members will actually use.
As your community grows, you'll add, prune and learn what needs to change based on your time requirements and what your members need.
And remember, Discord is a place for people. Even the best-designed server won't accomplish much if there's nobody around to welcome members, answer questions, and start meaningful conversation.
So get the technical foundation right, then put your attention toward building relationships with your audience.
Need a Hand Setting Up Your Discord?
If you're planning a new Discord server for your business or project, ModWise can help you get it built, configured, and ready for your community.
ModWise uses tried and true server setups that are not only more secure, but take less time than learning and configuring every setting or role. If you've not yet built your Discord but you plan to, send us a message! It's both faster and better for you if we build your server and pass you the keys, rather than fixing a server that's been started by someone else.
We'll meet with you and create the perfect Discord, customized to your needs, and ready to scale. Avoid the learning curve and put our experience to work for your project. We also provide expert staff to help you moderate and manage your community, if or when you decide to hire a dedicated pro.
A Special Offer for New Projects
For projects just getting started, we offer a one-hour consultation for $75.
We'll discuss what you're building, what your community needs, and what kind of configuration makes sense for your goals.
If you'd prefer to have us handle the setup, we also offer the following additional setup pricing:
| Server Setup | Additional Setup Price |
|---|---|
| Small startup community | $150 |
| Midsized standard community | $500 |
| Professional community | Starting at $1,500 |
These prices cover the initial server setup and audit. Premium bot subscriptions, custom bot development, and ongoing community management are not included. Professional community pricing is quoted based on scope.
Whether you need some guidance or want us to handle the setup from start to finish, we're happy to discuss your project and recommend the approach that makes sense.
Ready to Get Started?
If you've got a Discord community in mind, tell us what you're building.
We'll help you understand what you'll need, what you can reasonably handle yourself, and where our experience can save you time and trouble.
Contact ModWise and let's get your server built properly from the beginning.